Well here we are- Dec. 25! And I failed completing my challenge to myself to complete 100 Christmas projects in 100 days. I had to stop my plans about 13 days ago because of a lot of unexpected actives that came up. We had many hospital visits, a funeral, and family business to attend to that was completely unplanned.
I am not sorry I started this project! I had so much fun attempting all of the crafts and projects! And I got so much done! I was sad that I couldn't finish, if for no other reason than that I have not exactly been in the Christmas mood the last 2 weeks.
I plan on taking a relaxing fun filled day with my family as we stop to remember Jesus Christs birth, and that he came to die to save us from our sins and give us peace with God!
I have plans to continue this blog with new challenges and ideas at the beginning of the new year! If you have any ideas for projects, crafts, or a fun series let me know!
Until then- God bless us, everyone!
Pin It
Tuesday, December 25, 2012
Tuesday, December 18, 2012
Day 86: Hot Chocolate Bar
We had a blast at our annual youth Christmas party at church. This year we treated the kids to a hot cholocolate bar! We had all different kinds of marshmallows, candies and spices to add in, peppermints to stir with and homemade hot chocolate!


 Here is the link for this awesome crockpot hot chocolate but be warned it is VERY sweet!
Pin It
Here is the link for this awesome crockpot hot chocolate but be warned it is VERY sweet!
Pin It


Josh wanted to make sure he was in the picture :)


Pete told me that people love gummie bears in hot chocolate just to bother me but I bought them anyway.


Day 85: Wooden Nativity Set
I am FINALLY able to write a blog!! The last 2 weeks have been like none others! Please continue to be patient with me while I get our lives straightened out again! This won't be very detailed but here it is.
The wooden Nativity set was supposed to be made with blocks of wood and silhouettes of the nativity characters. I couldn't find any printable silhouettes that were the correct size of the blocks. So we ended up printing these awesome coloring pages and Landon and I had an afternoon of coloring! Then we cut out all of the characters and mod poged them on painted blocks. We just used the left over blocks from the Christmas mod podge sayings gluing some of them together to make them the right size.


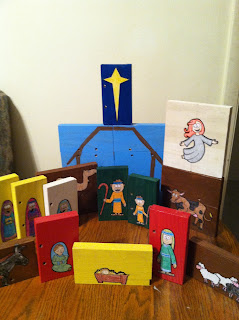 Landon has had a lot of fun playing with these!
Pin It
Landon has had a lot of fun playing with these!
Pin It
The wooden Nativity set was supposed to be made with blocks of wood and silhouettes of the nativity characters. I couldn't find any printable silhouettes that were the correct size of the blocks. So we ended up printing these awesome coloring pages and Landon and I had an afternoon of coloring! Then we cut out all of the characters and mod poged them on painted blocks. We just used the left over blocks from the Christmas mod podge sayings gluing some of them together to make them the right size.


Monday, December 10, 2012
Project List: Week 13
I accidently blogged about personalized roasting sticks last week instead of the crochet dog sweater so that project will go on this weeks list. And the list is...
Crochet Dog Sweater
Block Nativity Set (mine is much different than this but this is the idea)
Ruffled Apron
Lumps of Coal
Fire Crackers (crackers)
Tulle Christmas Tree
Pumpkin Cheesecake Bites
I bet you are all busy busy on your Christmas activities by now! Have fun!
Pin It
Crochet Dog Sweater
Block Nativity Set (mine is much different than this but this is the idea)
Ruffled Apron
Lumps of Coal
Fire Crackers (crackers)
Tulle Christmas Tree
Pumpkin Cheesecake Bites
I bet you are all busy busy on your Christmas activities by now! Have fun!
Pin It
Day 84: Coffee and Cookies
One of Landon's activities on his "25 days count down" was to take coffee and cookies to the library workers. This was a real fun activity that Landon and the workers enjoyed!
We started with cold bottled coffee and some large store bought cookies.


We started with cold bottled coffee and some large store bought cookies.

We pulled out 4 sandwich bags and placed 2 cookies in each bag. Then, we tied the bags around the coffee bottle with Christmas ribbon.
This is not a very good picture but you get the idea. After we tied the cookies on all 4 coffees we placed them back in the coffee box for Landon to carry.

He had a great time being the delivery man and telling everyone merry Christmas!
(and checking out a movie for later)

Needless to say Ms. Ann (above) and the other library workers were very excited to receive Landon's gift! This should definitely be a tradition!
Pin It
Sunday, December 9, 2012
And the Winner is...
Today was the last day to enter our drawing for a Christmas box of homemade goodies from this blog. After entering all the names of those who "liked" our Facebook page I drew a name and the winner is...
Jessica P.
Congrats! You will be contacted via Facebook
Pin It
Day 83: Personalized Roasting Sticks
Making personalized roasting sticks turned out to be a pretty big ordeal. Did you know that it is impossible to find wire hangers without a plastic coating on it?! I looked and looked and looked for them with no success. We decided to try using 16 gage wire. This wasn't stiff enough. We doubled it up and even tripled and quadrupled it and it still was to flimsy.
We went to Lowe's to search for a metal stick that might work for your roasting sticks. We found some that looked perfect but they were zinc covered and left back stuff all over our hands so we were afraid of poisoning people. We found some more that also looked like they would work but they were almost $3 a piece and I had to make 20 of these, so that was a big no!
We finally went to Wal-Mart and bought plastic covered wire hangers. We brought them home and Pete went to work on striping them of all the plastic with a knife. After all the plastic was removed he straightened them with pliers and cut them to size with wire cutters.
I took 3 thick dowel rods and using my trusty hack saw, cut them all to the length that I wanted my handles to be.
 After they were all cut, I sanded the ends and painted each handle a different color using acrylic paint.
 Pete drilled a hole in 1 end of each of them big enough to put the wire stick into. I used a little wood glue to ensure that the sticks would stay in the handles.
After the handles dried I painted a yellow strip down the middle of each for everyone to write their names on there own stick with a sharpie.


They really turned out great! After using them, the only thing I would have done different is to make them a little longer. We had a great time using them at our annual "decorate Mama T's Christmas tree party".
Pin It
We went to Lowe's to search for a metal stick that might work for your roasting sticks. We found some that looked perfect but they were zinc covered and left back stuff all over our hands so we were afraid of poisoning people. We found some more that also looked like they would work but they were almost $3 a piece and I had to make 20 of these, so that was a big no!
We finally went to Wal-Mart and bought plastic covered wire hangers. We brought them home and Pete went to work on striping them of all the plastic with a knife. After all the plastic was removed he straightened them with pliers and cut them to size with wire cutters.
I took 3 thick dowel rods and using my trusty hack saw, cut them all to the length that I wanted my handles to be.

After the handles dried I painted a yellow strip down the middle of each for everyone to write their names on there own stick with a sharpie.


They really turned out great! After using them, the only thing I would have done different is to make them a little longer. We had a great time using them at our annual "decorate Mama T's Christmas tree party".
Pin It
Saturday, December 8, 2012
Day 82: Christmas Tree Nails
There is not much to tell about these Christmas tree nails. The steps are simple they just take some time.
To begin, chose 2 different colors of nail polish, 1 for the base color and 1 for the Christmas tree. You will also need a clear sparkle nail polish and if you chose, a "topper" for your tree. I found these little vials of nail decorations at Dollar Tree!

First, paint your nail the base color and let dry completely. I usually keep my nails short and I also have very short nail beds so I have a small space to work with. You may have an easier time with this project if you have longer finger nails.

The tutorial called for painters tape for this next step but all I had was masking tape. It worked just fine. Simply stick 2 pieces of tape on 1 nail forming an open triangle at the end of your nail.
 Paint with polish you chose for the tree. After the polish is set you can remove the tape. Let dry completely. Next, brush over the nail with the sparkle polish and using tweezers place a "topper" on your tree. I chose red stars. You may want to brush a thin coat of clear over the nail after you are finished to help hold the decoration in place and help even out the bumpiness of the nail.
 They took a while and the stars were a challenge to put on but they I really liked them! For sure something fun to try!
Pin It
To begin, chose 2 different colors of nail polish, 1 for the base color and 1 for the Christmas tree. You will also need a clear sparkle nail polish and if you chose, a "topper" for your tree. I found these little vials of nail decorations at Dollar Tree!
First, paint your nail the base color and let dry completely. I usually keep my nails short and I also have very short nail beds so I have a small space to work with. You may have an easier time with this project if you have longer finger nails.

The tutorial called for painters tape for this next step but all I had was masking tape. It worked just fine. Simply stick 2 pieces of tape on 1 nail forming an open triangle at the end of your nail.


Pin It
Friday, December 7, 2012
Extra Drawing Entries!
The drawing for the Christmas goodies box is just 1 day away! For your name to be entered an EXTRA time in the drawing just share this link!
If you have not "liked" our Facebook page please do so by Sunday Dec. 9th, for your name to be added to our drawing for a box of home created Christmas goodies! Pin It
If you have not "liked" our Facebook page please do so by Sunday Dec. 9th, for your name to be added to our drawing for a box of home created Christmas goodies! Pin It
Day 81: Mog Podge Christmas Sayings
The mog podge Christmas sayings was a project that we had fun making at my crafter meet-up. These were very simple and easy to make and it was a blast to see where everybody's creativity led them.
We started with some wood blocks that were approximately 2 1/2 X 4". A big shout out and thanks to Hall's Furniture in Henderson TX for donating all of the wood for this project!
 My sweet husband drilled 2 holes in the top of each block to make space for a hanger. Landon helped sand the sides of some of the blocks.

We painted our blocks with acrylic paint and let them dry. While they were drying we decided what our individual blocks would say. Everyone thought of something different to put on their blocks.
We dug through letters I had cut out of magazines and some even searched through more magazines to find just the right combination of letters and words. Everyone's looked different!

To attach the letters to the block we covered our block mod podge and put the letters in place. Then we covered the block with mod podge again this time fairly thickly.

 After they were dry we cut a hanger out of 16 gage multi-purpose wire. This can be however long you want it to be. Then, we just laced it through both holes and using the pliers turned the ends up and twisted it around the front wire.
I had prepared my block ahead of time to use as an example and I put a bow of ribbon on mine. I accidentally forgot to take the ribbon to our meet-up! Sorry y'all! Hopefully they all had some ribbon at home to finish them up.
This is mine. It says "His name shall be called Emmanuel" taken from Matthew 1:23.

We started with some wood blocks that were approximately 2 1/2 X 4". A big shout out and thanks to Hall's Furniture in Henderson TX for donating all of the wood for this project!


We painted our blocks with acrylic paint and let them dry. While they were drying we decided what our individual blocks would say. Everyone thought of something different to put on their blocks.
We dug through letters I had cut out of magazines and some even searched through more magazines to find just the right combination of letters and words. Everyone's looked different!

To attach the letters to the block we covered our block mod podge and put the letters in place. Then we covered the block with mod podge again this time fairly thickly.

Don't worry about the glue being white it dries clear. You can buy some mog podge that will dry leaving a pretty shine.
Here is a picture of some drying. Landon made the red one. He wanted it to say Merry Christmas.

I had prepared my block ahead of time to use as an example and I put a bow of ribbon on mine. I accidentally forgot to take the ribbon to our meet-up! Sorry y'all! Hopefully they all had some ribbon at home to finish them up.
This is mine. It says "His name shall be called Emmanuel" taken from Matthew 1:23.

Other idea's were a count down till Christmas, kids names to hang on their doors, and other Christmas sayings such as "Joy to the world", and "Don't get your tinsel in a tangle".
Just have fun with it and be creative!
Pin It
Thursday, December 6, 2012
Day 79: Chocolate Dipped Peppermint Sticks
This year for Christmas Landon is giving Christmas snacks to those on his gift list. We searched around for some cute Christmas
snacks and found some really interesting ideas! Chocolate dipped peppermint sticks was one of those ideas.
The picture that was inspiration for this project showed regular peppermint sticks but we thought it might be more fun to use candy canes. Not to mention I couldn’t find any long peppermint sticks! There were 12 candy canes in the package but we ended up with 11 to give because I accidentally broke one when I opened it. Landon was excited that I did because that meant he could eat it! He said they were very good by the way.

 We thought about dipping the straight part of the candy cane but chose instead to dip the crook of the cane. That way the pretty part is at the top.

After dipping the cane we laid it on wax paper and sprinkled it with red, green, and white Christmas sprinkles. Landon tried different kinds but the little ball sprinkles stuck the best and looked cutest.

 Pin It
The picture that was inspiration for this project showed regular peppermint sticks but we thought it might be more fun to use candy canes. Not to mention I couldn’t find any long peppermint sticks! There were 12 candy canes in the package but we ended up with 11 to give because I accidentally broke one when I opened it. Landon was excited that I did because that meant he could eat it! He said they were very good by the way.

We started by melting some white almond bark. I knew that this project wouldn’t take a lot of almond bark but I wanted the melty goodness to be deep enough for me to dip the candy cane for a good coating. So, we used a small glass measuring cup to do the melting. Because the cup wasn’t very big we were able to use a small amount (about 2 ½ squares) of almond bark and kept it deep enough to dip.


After dipping the cane we laid it on wax paper and sprinkled it with red, green, and white Christmas sprinkles. Landon tried different kinds but the little ball sprinkles stuck the best and looked cutest.

When we finished all the candy canes we let them dry for 20-30 minutes. After they were completely set we put them in sandwich bags and tied ribbon around them. I would have preferred cute Christmas ribbon but instead we used some less feminine looking ribbon.

Day 80: Santa Hat Pretzels
Once again we are working on Christmas snacks. Today's snack was Santa hat pretzels. I only had a picture to follow for these and they did not turn out very good.
We started by melting the left over almond bark from yesterday's project. We did have to add a little more almond bark to the measuring cup today.

We dipped one side of a pretzel into the almond bark and placed it on a piece of foil (we used all the wax paper yesterday).


 Pin It
We started by melting the left over almond bark from yesterday's project. We did have to add a little more almond bark to the measuring cup today.

We dipped one side of a pretzel into the almond bark and placed it on a piece of foil (we used all the wax paper yesterday).

We sprinkled the almond bark with red sprinkles.

Next, we tried to stick a mini marshmallow on top of the pretzel but it was to tall and looked funny. We ended up pulling the mini marshmallows in half and just using half a mini marshmallow on each pretzel.

This is what they ended up looking like. Not really like Santa hats unless you use some imagination. Maybe some of you who are more artsy can make them work. BUT, they do taste really good!

Tuesday, December 4, 2012
Day 78: Snowman Kit
We almost never get snow. When we are blessed we might see it once a year. Anytime we have snow the world stops and we all spend the day making snow angels, sledding, making snowmen, and drinking hot chocolate.
I thought it would be fun to have a snowman kit all ready to go for when and if it ever snows.
To make a snowman kit you need:
Fimo or Sculpy clay
Small dowel rods
Oven
I pulled out some Fimo clay I have had for years hoping that it was still soft and workable. Thankfully it was, so that saved me some money and used up some old supplies. We used some dowel rods that we had and wire cutters to cut them down to size.
 We just cut our rods in half which made them about 4-6 in. each.

Next, we kneaded our clay to make it soft and pliable. For our carrot nose we mixed yellow and red because we didn't have orange clay. This made a good lesson in colors! Landon formed the clay into a carrot shape. Then, we stuck a stick in the thick end of the carrot. He wanted to make lines in the clay to make it look more like a carrot. He used a butter knife to do this.
 We made 6 pieces of "coal" for the mouth out of black clay. All we did was stick a ball of clay on the end of a stick and formed it into uneven shapes. However we thought coal would look.
We decided to make the eyes look like buttons. To do this we took green clay and blue clay and made 2 - 2 1/2 in. discs.


I thought it would be fun to have a snowman kit all ready to go for when and if it ever snows.
To make a snowman kit you need:
Fimo or Sculpy clay
Small dowel rods
Oven
I pulled out some Fimo clay I have had for years hoping that it was still soft and workable. Thankfully it was, so that saved me some money and used up some old supplies. We used some dowel rods that we had and wire cutters to cut them down to size.


Next, we kneaded our clay to make it soft and pliable. For our carrot nose we mixed yellow and red because we didn't have orange clay. This made a good lesson in colors! Landon formed the clay into a carrot shape. Then, we stuck a stick in the thick end of the carrot. He wanted to make lines in the clay to make it look more like a carrot. He used a butter knife to do this.

We decided to make the eyes look like buttons. To do this we took green clay and blue clay and made 2 - 2 1/2 in. discs.
We rolled out a thin piece of clay and outlined the top of the disc.
Using 1 of the dowel rods we made 4 holes in the disc.
Using 2 more pieces of thinly rolled clay we stuck them in the holes, criss crossing them to make it look like a sewn button.
To place these on a dowel rod we used a little ball of clay and placed it around the top of the stick. Then, we stuck the button on top of that.
Placing all the pieces on a cookie sheet, we baked them in a 230 degree oven for 30 minutes.

After they cool they are ready to be used or stashed away for a snowy day! You can even add a hat and scarf to your kit if you are so inclined.
We can't wait to use our snowman kit!
Pin It
Monday, December 3, 2012
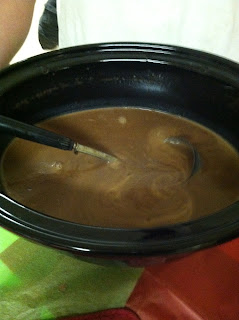
Day 77: Gingerbread Play Dough
Landon and I have had a blast discovering homemade play dough! He loved the
snow play dough we made a week or so ago and this project was just as fun!
We began the gingerbread play dough by combining a cup flour, and 1/2 cup salt, with 2 teaspoons cream of tartar, and 2 tablespoons pumpkin spice. The recipe called for cinnamon, ginger, nutmeg, and cloves but we decided to use the pumpkin pie spice instead.

After combining all of the dry ingredients we added 1 cup water, and 2 tablespoons vegetable oil, stirred it together very well, and turned the stove on medium heat.

It did take a little while for the dough to start cooking. Once it was nice and doughy we turned it on to wax paper to cool.

Easy and fun. Landon had a great time making gingerbread men out of his play dough and it made the house smell awesome! Pin It
Subscribe to:
Posts (Atom)