Wednesday, October 31, 2012

Day 48: Travel Pillow

This project was fast. I saw these on etsy and thought they looked easy to make. I made mine a lot smaller than the ones I saw online because I hate having to deal with a big pillow on a trip. It always gets in the way when you aren't using it.
I cut a piece of fleece that was 18x10 in.

With right sides together sew both short sides and 1 long side. Turn the case right side out and measuring from the middle, mark equal amounts of space on each side. I did mine 1 1/2 in. on each side. You will want to check out your seat belt to see how wide you should make your space.
With case still turned right side out sew straight through where you made your marks on both sides of the middle. This is where your seat belt goes.
Using Poly-fill, stuff  both open sides of the pillow and sew up the openings. Trim any excess.
 
 
Can't wait to use it!
My pillow is very small but this is easy to adjust to make any size you want.
Pin It

Day 46: Rustic Leather Journal

A rustic leather journal that I can MAKE? Yes, please!
This project was so easy! It only cost me $3 for a bag of suede scraps and I will be able to use the rest of them for another project. If you buy a bag of scraps make sure there is a piece large enough to get a 5x7 sheet out of it.
Cut a 5x7 piece and a 3x4 of the leather or suede whatever you have chosen to use.
Using 4 pieces of copy paper fold in half horizontally and cut, now you have 8 pieces. Fold again and cut you now have 16 pieces. Fold another time and do not cut.
Using the longest stitch setting on your machine, sew down the middle of folded paper.
 
Cut round corners of the 5x7 piece. Position the paper in the middle of the piece of suede and sew again.
 
Cutting in circles cut a long strip of material out of the 3x4 in piece and sew the middle of the strip to the spin of the book.
 
Done! So simple and it seems to me this would be an awesome homemade gift for those hard to make for men in your life!
 
Pin It

Tuesday, October 30, 2012

Day 45: Cookie Cutter Pumpkin Decorating

Every year we love to pick out a pumpkin and take it home to decorate.

We have decorated them in all different ways. This year we decided to try carving our pumpkin using the cookie cutter method.
This works best with metal cookie cutters but we used plastic ones too and they work fine.
First, cut the top off the pumpkin and clean out the insides. Our pumpkin must not have been very ripe because the flesh was very thick and there were very few seeds. We like to season our seeds with cinnamon and sugar and bake them until on 200 until they are dry.
 
Place the cutter where you want on the pumpkin and tap with a hammer until it cuts through the flesh of the pumpkin. 
Our pumpkin was to thick to get the cutter all the way through so we had to use a knife as well.
We have never done real jack o' lanterns but this year that is what Landon wanted to do. We used a star cutter for the eyes, a leaf cutter for the "angry" eyebrows, we cut a triangle for the nose, and used a crescent moon cutter for the mouth.

Landon was very proud!
Last year our pumpkin molded very quickly but I read that spraying it every day with a little bleach will prevent that from happening as fast. I will be trying that this year.
And if carving is not for you here is some inspiration from our pumpkin a few years ago.


This Horton pumpkin was made from 2 pumpkins, apples on dowel rods, foam sheets, and foil. It landed my little monkey and me 1st place in a pumpkin decorating contest! Fun times and good memories! Pin It

Day 44: Retro Fun Apron

I have been looking forward to making this Retro Fun Apron for a long time. I am sure you have realized that aprons are a theme of mine this year. That is rather ironic because I never use aprons and I am not even sure I own one. I think they are super cute though!
I had bought a blue plaid material for this project and was actually able to use a little of it on a previous apron. I also used a blue flowered material, a dark blue for the back, and blue bias tape.
 
I printed out the pattern and pieced it together. This was a little confusing but I eventually managed to figure it out. This is what the pattern ended up looking like.
 
I cut out all of my materials and began to sew. I still have trouble rounding corners with bias tape but the instructions on the site had a linked tutorial on how to sew bias tape, a good resource.
I ended up making my sash a little different than the pattern. I sewed 2 strips together to make 1 long sash and looped it through the front of the apron making a belt across the front to tie in the back.
 
 
And there it is. The picture isn't very good but you get the idea. I know the recipient of this gift will love it!
Pin It

Sunday, October 28, 2012

Week 7 Project List

Sunday October 28 - Paper Christmas Boxes
Monday October 29 - Retro Fun Apron
Tuesday October 30 -Cookie Cutter Pumpkin Decorating
Wednesdau October 31 - Mummy Meatloaf
Thursday November 1 - Travel Pillow (no tutorial, will need 1/2 yard cotton material and stuffing)
Friday November 2 -Bows for Wrapping
Saturday November 3 - Rustic Leather Journal

What's on your list this week? Halloween? Thanksgiving? Christmas?
Pin It

Budget Update: Week 6

1/2 yard grey felt for stockings $3
2 cuts of fleece 1/4 yard a piece for owl rice packs $3
Rice for owl rice packs $2
Total for week 6 = $8 Pin It

Day 43: Paper Chirstmas Boxes

Oh my goodness gracious! I made these cute boxes that I found on pintrest. All I did was go to the website and print the templates, cut them out, and glued them together. Then I started to write this blog. But, when tried to add a link to the template that I used I couldn't find the site again. I didn't pin the site and when I did a search again it was no where to be found. I have looked for an hour on pintrest and google. Pete even looked for it but nope nothing. It is the strangest thing. It apparently was wiped off the face of the Internet in the 20 mins it took me to make them.
Here are some links to different box templates.
cupcake box
diy-geometric-favor-boxes
Hanging heart box

These are mine.


Pin It

Day 42: Crochet Cookie Monster Hat

Thanks for being patient with me. That wedding really had me turned upside down! I did manage to get this project finished in time but couldn't find my camera in all the wedding mess to take pictures for the blog.
The pattern for this project can be found HERE. It is the same basic pattern as the crochet Elmo project a couple weeks ago.
I used a light blue yarn for the hat and a chocolate brown for the cookie.
I followed the pattern to make the hat big enough for a 4-year-old but it turned out kind of long so, I flipped up the edge and tacked it in place.


This finished project is for one of my sweet little nieces! Love you Ari! Pin It

Thursday, October 25, 2012

Day 41: Felt Journal Cover

A while ago I bought some little journals at the dollar store with plans to redecorate theml with felt. It never really happened but when I saw this picture I was inspired.


I hot glued a textured felt to the front and back of the journal. I also glued a cotton fabric to the inside of the journal to over the edges of the felt.  I glued a small piece of elastic between the layers of the back of the journal and button to the front to make a closure.


Then for the fun part, decorating! I glued, sewed and embroidered and this is what I ended up with.


Kinda cute huh? It will be a good stocking stuffer for sure! Pin It

Day 40: Fleece Owl Rice Packs

Rice packs are wonderful to keep around for when you need a handy hot pack. All you have to do is throw one of these in the microwave for about 45 seconds and slip them into your pocket or in your bed to keep warm.
I bought a little bit of fleece and also used some odds and ends I had. I drew an owl pattern that you can find HERE and cut all the piece out of different patterns of fleece.
After cutting I sewed the pupils onto the eyes and the beak across the bottom of the eyes. I then sewed the belly and eyes onto the front owl and sewed the owl front to the owl back leaving a small hole.
I used a funel to help me fill the bird with rice and sewed up the hole. A 2 lb bag of rice filled 5 owls for me. Pin It

Day 39: Super Hero Cape

The other day I conducted a little interview with my son. Landon has made up pretend super heroes since he was old enough to talk. I have always wanted to get them all down on paper so he would have a good reference when he becomes a director and screen writer... or maybe just to keep a little piece of his childhood.
So, Landon and I went to documenting 3 of his super heroes, Nitro Man, Lighting Boy, and Spike Man.

Nitro Man has the power to freeze people and things. He can smash even the thickest ice, make ice ropes to climb, and ice skates to help him get around fast.
His weakness is ironical cold weather (the effects of his cold are not as powerful when everything around him is cold as well), and of course fire.
Nitro Man is an alien who got his powers when Nitrogen was poured on him. He gets an extra boost of power by eating ice mints.
His color is ice blue and his enemy is his brother, Iceman. His saying is "Ice out".
Lighting Boy's powers include shocking people with hands, controlling "thundery" weather, calling down lighting, and recharging electrical things.
His weakness is water. (Landon thought it was funny that he could never take a bath).
Lighting Boy got his power by being struck by lighting. His main enemy is Water Man.
Spike Man has the power to turn his hands into spike balls like a mace and he can call spikes from the ground.
His weakness is really hot fire and his enemy is Inferno Man because he can melt Spike Man's metal spikes. Spike Man is also an alien from Spike Ball planet.
His saying is "spikearoni!"

Landon has so much fun pretending to be these super heroes that I thought he would really love to have some super hero capes to go along with his play.
I dug up some old t-shirts and cut off the sleeves and the front of the shirt, leaving the neck in tact.


Next, I cut a few sheets of felt to the size needed to cover up the logos on the back of the shirts I used. I decorated the felt with the super hero names and symbols.  Then I sewed each felt sheet onto the back of the shirts.


Landon was so excited! It maybe the best gift I have ever given him and it took almost no time and no money. I love it when fun doesn't have to cost a lot!

 
And I am proud of my son and his very active imagination :)
 
Pin It

Tuesday, October 23, 2012

Day 38: Super Hero Masks

When I saw these super hero masks I knew I had to make them! They are a perfect gift for any super hero enthusiest!
They took me a few hours but they were well worth it.
I downloaded the mask templates and cut them out.
Then I gathered up my felt. God really stretched my supplies on this one! I had every color of felt I needed, some of them exactly enough!
I traced each pattern on to the right fabric for that mask.
 
 
I sewed the loose peices (hair, eye brows, etc.) on to the front of the corrisponding masks.
 
 
I cut a 14 in.peice of elastic for each mask and sewed it between the front and back layers of the mask, sewed the mask front and back together making sure to sew around the eyes as well.
It took a while but it wasn't hard.
 
They are oh so cute! I would buy these in a heart beat but instead they cost me nothing! What a great Christmas gift they will be!


Pin It

Monday, October 22, 2012

Day 37: Felt Stockings

We have spent 8 Christmas' as a family and we had yet to get real stockings. The stockings we had were just a dollar store version.
So, today I headed on over to Hobby Lobby and bought a 1/2 yard of grey felt. When I got home I cut the felt into 3 equal pieces (double layered). Then I drew a large outline of a stocking and cut it out.
I really wanted to sew these together but today I moved my sewing machine and all of my crafts into the other room. My little sister is getting married and moving out so I am getting a new craft room. However, She is still with us until Friday and had already gone to bed when I started this project tonight. So, sewing was out of the question. Glue to the rescue! Craft glue is so much easier than sewing anyway.


After gluing the front and back of the stockings together, I made some decorations of sheets of felt and cut out names to glue on the front. I also cut a long strip of felt and glued the ends together and glued it inside the top of the stocking to make a hanger.

 
I am excited to have real stockings this year! What kind of stockings does your family use?
Pin It

Sunday, October 21, 2012

Day 36: Dough Gift Tags

When I made my list of 100 projects I intended to use a different dough recipe for this project but I loved the baking soda, corn starch recipe from yesterday's project so much I decided to use it again.
I like this dough because it is so smooth and completely white unlike salt doughs. And, as you saw yesterday it was very simple to make.

 
I rolled out the dough to 1/4 in. and used Christmas cookies cutters to cut out fun shapes and used a straw to make a hole to sting the tags on to bows.


After baking the dough for an hour at 175, I used stamps to mark my tags.

 
I personalized some of the tags and made others that were general so I can use them on any gift.
 
 
I think they turned out pretty cute but that is just me. It is at least a little bit of a different spin on your gift tag!
 
Pin It

Saturday, October 20, 2012

Week 5 Budget Update

Altoids $1.50 for mouse in a tin
Earrings $1.00 for picture "cuff links" (turned into earrings instead)
Shrinky Dink $6 for earrings
Flash light $1 for fort kit
Baking soda .50 for finger print ornament
Silver paint $2 for finger print ornament
Total = $12 Pin It

Week 6 Project List

Sunday October 21 - Dough Gift Tags
Monday October 22- Felt Stocking (No tutorial will be using cuts of felt off a bolt and sheets of felt)
Tuesday October 23 - Super Hero Masks
Wednesday October 24 - Super Hero Capes
Thursday October 25 -  Owl Fleece Rice Packs (No tutorial. You will need fleece, rice and felt)
Friday October 26 -Felt Journal Covers (picture only)
Saturday October 27 - Cookie Monster Hat Pin It

Day 35: Family Finger Print Ornament

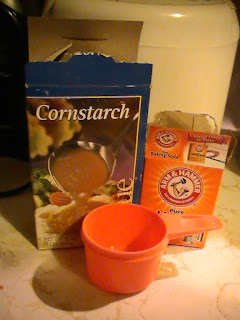
To make this finger print ornament I used a baking soda and corn starch dough.
For the dough you need:
1 cup baking soda
1/2 cup corn starch
3/4 cup water


Mix all 3 ingredients in a small sauce pan over medium heat. Stirring, until the dough gets thick like play dough. Remove from heat. Place in a bowl and let cool.
 
After the dough is cooled, roll out to 1/4 in. thick and cut with cookie cutters. Dust work space with corn starch so that the dough will not stick. 
We chose a stocking cookie cutter. Use a straw to make a hole to string a ribbon through.
 
 
We put our thumb prints along the side of the stocking and baked at 175 for an hour.
 
After the ornament was baked and cooled I painted it silver and labeled our prints with whose was whose.
 
 
Lastly I glued some ribbon around the top for decoration and strung some ribbon through the hole for a hanger.
 
Pin It

Friday, October 19, 2012

Day 34: Crochet Hat
Since I learned to crochet a year ago I have made many projects but I have yet to make myself anything. So what better time to make something for myself than during my quest to make 100 projects.  I wanted to make a hat but I had a hard time deciding what pattern to use. I searched Ravelry up and down and ended up choosing this slouch beanie.
I recently went through all of my yarn collection and found that it is crazy how much I have! After looking at all of the yarn I had, I decided I better not buy anymore until I use a lot of what I have already. So, I decided to make this hat 3 toned in an effort to use up my yarn.
I had white, a little red, and a multi colored red in 100% cotton.
I started with the multi colored and worked until it was gone. Then, I joined the red and finished it off too. I ended the hat with white.
Here is the finished project, front, back, and side.


Pin It

Thursday, October 18, 2012

Day 33: Super Hero Fort Kit

A super hero fort kit? Sounds like something any 7-year-old boy would love! Very cheap and quick to make too.

I used a light green cotton fabric (actually, I think it was from old curtains) and cut a 12x16 piece. I also cut a lightening bolt out of yellow fabric.


I sewed the lighten bolt in the middle of one piece of fabric using a zig zag stitch so I wouldn't have to turn in the raw edges.
I sewed the 2 pieces of green material together to make a bag, and hemmed the top leaving an opening to put a drawstring through. I cut off the ends of an old lanyard and used it for a drawstring.


I took an old t-shirt and cut 8 strips from it  I took 2 sheets  and sewed 1 of the t-shirt strips to each corner of the sheets. Landon can use these to tie his fort in place.
I gathered up a few things to help him make a fort, metal clips, clothes pins, rope, and glow sticks for fun.
 
I put it all in the bag I made and it is ready for Landon to be creative!
 
 
Pin It